Troubleshoot To Get the Most Out of Black-Box Magic
Electronic control modules (computer ECMs) are on machines to stay because of their performance and emissions advantages. Their primary disadvantage is that they add wiring to the machine, and very few electrical-system problems are easy to fix. Luckily, the black box does an exceptional job tracing active (not intermittent) faults to the circuits that it monitors.
The vast majority of electrical problems are going to be in the wiring harness—short or open circuits, or high resistance.
"The monitor in the cab supplies everything I need to know in most cases," says Dave Morgan, field service specialist with Komatsu dealer Continental Equipment in Dallas. "I only use a laptop when I'm chasing a tough intermittent problem, or when I need information from a CD ROM."
Monitors in equipment cabs started off flashing lights in code. Now LCD screens display the numerical code, and some actually name the fault. Each manufacturer's system is slightly different, and every model upgrade tends to evolve with technology. Prepare to troubleshoot by making sure the machine serial number matches the schematics and other documents you will use, and by reviewing the system-operation sections of the manual.
Begin troubleshooting most faults by accessing the computer's diagnostic mode. It usually requires holding down a couple of buttons on the instrument panel. Most systems go straight to a display of active faults. Use menus on the screen to navigate to a record of intermittent faults and operating parameters such as engine speed, coolant temperature, hydraulic pressure, and anything else the electronic system monitors.
Make a list of all the faults first because intermittent problems often disappear when you unplug and reconnect connectors. Check the service manual or schematic for descriptions of the codes and guidance about what to do first.
"Work from the simple to the complex," Morgan advises. "In 12 years, I've only seen a few controllers that really needed to be replaced."
Morgan suggests checking grounds, fuses, battery voltage, and connectors to be sure the system is getting the right voltage. Some components don't work properly when control voltage falls below a minimum rating. An excavator's engine may start, for example, but the swing-brake solenoid won't release, so the house won't swing.
Although most technicians hate this step the most, service manuals typically recommend carefully inspecting connectors and wiring first. Turn on power to the ECM after refitting each connector and check the fault codes. If a code changes, the most likely reason will be loose terminals, moisture, corrosion, or poorly mated connectors.
Check exposed wiring for nicks or worn spots in the insulation, look for flattened spots at bends in the harness, and make sure the clamps properly secure the entire wire bundle. Moisture can travel through the wires all the way to the ECM. If you find even a tiny amount of moisture in a connector, check the whole harness for missing or breached seals or exposed wire where moisture might get under the insulation. Remember: poking holes in the wires with a meter probe is a main cause of wire failure.
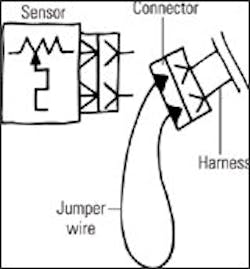
Harness routings and the wrap used to protect the harnesses can make it hard to inspect wires. In the case of a shorted or open sensor circuit, the simplest troubleshooting step is usually to make sure the sensor isn't causing the problem. You can quickly check the sensor's condition by unplugging it, resetting the monitor panel, and switching the power back on (See Quick Tip). If the sensor isn't causing the problem, you can confirm the ECM is responding properly to inputs with a similar process of elimination (See Test the ECM. If power comes to the ECM through the same connector as the sensor, you can plug the connector into the ECM and short across the circuit pins from the back of the connector using a voltmeter's spoon leads, or by pulling the wires for that circuit out of the connector.)
Replacing segments of harness by jumping with a known good wire (See Bypass the Harness) can take you fairly close to where a short or open can be found.
Intermittent problems can be significantly more difficult to locate if circumstances at the time of the fault are hard to recreate. Again the ECM helps, this time with its snapshot of system conditions. Simulating those conditions can be difficult if the fault only occurs while decelerating a 30-ton load from 20 miles per hour on a rough section of haul road.
Some software used in computer service tools (such as Cat's Electronic Technician software) includes a wiggle test for finding intermittent problems in a harness. With the laptop plugged into the machine, you shake the harness. If you move it just right, the laptop will beep and the intermittent fault will be highlighted on-screen.
In a rare instance when you find a ruined electronic component, don't simply replace it and rush to the conclusion that you're done. You may only be treating a symptom, rather than solving the problem. The last thing you want to do is install a new $2,500 computer only to find that a failed 25-cent diode fries it in a month. Auto-industry technicians learned that lesson with suppression diodes that protect air-conditioning controllers from load spikes created when the compressor switches off. Now when they find a bad A/C controller, they check the compressor switch, too.
On-board computers won't solve electrical-system woes, but neither are they the villains many technicians consider them to be (judging from the number of perfectly good ones that show up in warranty bins). The big challenge is digging through the harness to find the wires that cause most problems. Compared to the downtime required to find these faults, "replace the wiring harness" may be the most cost-effective solution.
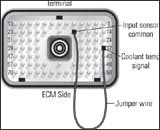
If a machine's computer tells you there's an active short circuit, it's pretty easy to confirm if the problem is in the sensor by unplugging it. If the fault code changes to "open," the sensor's bad. If the code remains open, the short is in the wiring. Pulling the sensor will help find an open fault, too. Use a jumper wire with appropriate pins or sockets to short across the sensor connector. If the open fault changes to "short," the problem is in the sensor, not the wiring.
The monitor in the cab keeps flashing a code. That's good. It means there's an active fault rather than an intermittent one, and engine controllers are great at helping find active faults. The service manual tells you the code indicates a short in the coolant-temperature sensor circuit. Inspecting the harness and connectors carefully doesn't uncover any problems. Unplugging the sensor doesn't change the fault. Now the Engine Control Module can help you diagnose it.
Switch off the power, unplug the sensor harness at the ECM, and turn the power back on. The monitor should tell you the coolant-sensor circuit is open (along with all the other temperature sensors). Switch off again. Make a jumper wire to mate with the ECM terminals, and short across the pin for the coolant-sensor's signal and the common temperature-sensor pin. Powering up, the ECM should show a short in the coolant-sensor circuit, confirming that it read the fault correctly. Time to check wires.
To find the location of a wiring problem, use a long jumper wire to replace the wire you suspect is short—in this case, the signal wire. Pull the signal wire from the connectors at the ECM and the sensor. Replace it with each end of a long jumper wire. Plug the sensor and the ECM back into the harness and switch on the ignition. If the fault disappears, you know the short is in the signal wire.
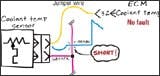
Pull the connector from the ECM and make sure other sensors that share the common wire are unplugged. Use the voltmeter to check continuity by setting it to its most sensitive level. Stick one lead in the socket for the coolant-sensor signal. Methodically test each socket wired to the connector. The meter should read ghost voltage (a very small, wavering value). If you hit a socket that reads true zero (0.00 volts), you've found the wire shorted to the coolant sensor wire.
Source: Dan Sullivan
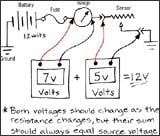
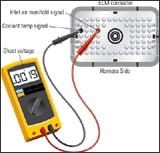
If you want to confirm that a sender is working properly, you can read the voltage drop across it, but the sender must be plugged into its circuit and powered up. Carefully use spoon leads that slip into a sealed connector. As with any circuit, the total voltage drop for all components in the circuit should equal the total input voltage. Test the sender voltage, or find the value in the manual before testing the system for failures. Typical sender voltages are 5V, 8V or 11V.